How to Install Trex Decking Like a Professional: Expert Tips
Trex decking is a popular choice for homeowners looking for durability, sustainability, and low maintenance in their outdoor spaces. Made from a blend of wood fibers and recycled plastics, Trex offers a long-lasting alternative to traditional wood decking. While installing Trex decking may seem like a complicated task, with the right tools, preparation, and techniques, it’s something most DIY enthusiasts can tackle. In this guide, we’ll walk you through how to install Trex decking like a professional, ensuring your deck looks great and lasts for years.
Planning and Preparing for the Installation
Before you begin installing Trex decking, planning and preparation are crucial for a smooth process. Start by measuring the area where you want to install the deck. This will help you determine how many planks you’ll need. When planning, consider the layout of the deck, such as whether you want the boards to run parallel or at a 45-degree angle to the joists.
You’ll also need to gather your materials. Trex decking comes in various colors and styles, so choose the one that best complements your home’s exterior. Besides the Trex decking boards, you’ll also need screws, fasteners, joists, a saw, drill, measuring tape, and level. It’s important to ensure that your deck structure is sturdy and up to code, so check for any local building regulations.
Building the Frame
The frame is the foundation of your deck, and it must be built properly to ensure the safety and durability of your Trex decking. Start by laying out the perimeter of the deck using string lines. Next, install the ledger board, which attaches to your house to support one side of the deck. Make sure it’s level and securely fastened.
Once the ledger board is in place, install the deck’s joists. These are the horizontal supports that the decking will rest on. Make sure the joists are spaced correctly, typically 16 inches apart, to provide sufficient support. You’ll also need to ensure that the joists are level across the entire deck frame. For added stability, use galvanized or stainless-steel fasteners to prevent rust.
Installing the First Trex Decking Board
After the frame is in place, it’s time to start installing the Trex decking boards. Begin by placing the first board at one end of the deck. Leave a small gap between the board and the edge of the frame to allow for expansion and drainage. Trex recommends leaving a 1/8-inch gap between boards for proper airflow and to avoid warping.
When securing the first board, make sure it is perfectly aligned with the edge of the frame. Use hidden fasteners or screws that are designed for Trex decking. These fasteners will allow for a clean, smooth look without visible screw holes. Once the first board is securely fastened, continue installing the rest of the boards, following the same process.
Cutting and Installing Additional Boards
As you progress, you’ll likely need to cut boards to fit the dimensions of your deck. When cutting Trex decking, use a circular saw with a fine-toothed blade to ensure clean, smooth edges. Wear a mask or work in a well-ventilated area, as cutting composite materials can produce dust.
For the best results, make sure all cuts are straight and that the boards are properly aligned before fastening them in place. If your deck has any angles or corners, be sure to measure and cut each board accordingly. The goal is to achieve a seamless, professional finish.
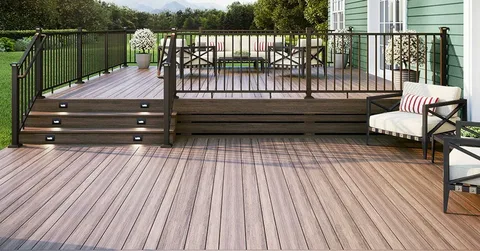
Installing the Deck’s Railing System
After the main decking is installed, it’s time to add the railing system. Trex offers a range of railing options, including traditional wood railing, glass, and modern aluminum designs. Choose a style that complements your deck design and follows your local building codes.
To install the railing, start by securing the posts to the deck’s frame. These posts provide support for the horizontal rails and balusters. Once the posts are in place, attach the top and bottom rails using the appropriate fasteners. Be sure to space the balusters evenly for both safety and aesthetics.
Finishing Touches and Cleaning
Once your Trex decking is installed, it’s time for the finishing touches. Check for any uneven edges or gaps that may need to be adjusted. Trim any overhanging edges and clean up any debris or dust from the installation process. Trex decking is designed to be low maintenance, but it’s still a good idea to give the entire deck a thorough cleaning.
For the best results, use a soft-bristle brush and a mild detergent to clean your Trex decking. Avoid using harsh chemicals or power washers, as they can damage the surface of the boards. With proper cleaning and maintenance, your Trex deck will look beautiful for years to come.
Conclusion:
Installing Trex decking like a professional is possible with the right preparation, tools, and attention to detail. By following these expert tips, you can create a beautiful, durable outdoor space that adds value to your home and provides a perfect place for relaxation. With low maintenance and a long lifespan, Trex decking is a great investment for your property. Whether you’re taking on the project yourself or hiring professionals, the results will be worth the effort.
FAQs
Q1: How long does it take to install Trex decking?
A1: The time it takes to install Trex decking depends on the size of your deck and your experience with similar projects. On average, a professional installation may take 2 to 3 days, while a DIY installation may take a weekend or longer.
Q2: Do I need to use special fasteners for Trex decking?
A2: Yes, Trex recommends using screws or hidden fasteners specifically designed for composite decking. These fasteners are designed to hold the boards securely and prevent damage.
Q3: Can I install Trex decking over an existing deck?
A3: Yes, you can install Trex decking over an existing deck as long as the structure is sound. You may need to add additional joists or make adjustments to the frame to ensure proper support.
Q4: Do I need to leave a gap between Trex decking boards?
A4: Yes, it’s important to leave a gap between Trex decking boards to allow for expansion and drainage. A 1/8-inch gap is typically recommended for optimal airflow and performance.
Q5: Can Trex decking be installed in any climate?
A5: Trex decking is designed to withstand a variety of climates, from hot summers to cold winters. However, proper installation is key to ensuring its longevity in any climate. Always follow the manufacturer’s instructions for best results.